Installing TIA MCP step by step
One Windows installer copies TIA MCP together with its own Python and registers it in your AI clients. It sets up remote access for ChatGPT and Microsoft 365 Copilot, installs local AI on request and activates the licence by signing in. It takes about five minutes and needs no administrator rights.
- Windows 10 and 11 (64-bit)
- TIA Portal V17 to V21
- no administrator rights
- no Python needed
- 7 days free
Before you start
All you need is the computer you already use for TIA Portal. The installer contains or downloads everything else.
Windows and TIA Portal
Windows 10 or 11 (64-bit) and TIA Portal V17 to V21 with TIA Openness installed. Openness is an option of the TIA Portal setup – you usually have it already.
Siemens TIA Openness group
The Windows user must be a member of the “Siemens TIA Openness” group. The installer adds you – you confirm the administrator prompt (UAC) once and sign out and back in after the installation.
AI client
Claude Desktop, VS Code with GitHub Copilot, Cursor, Codex and more, or ChatGPT and Microsoft 365 Copilot via remote access. Without a client you can start with local AI in the TIA MCP web interface.
Disk space and internet
TIA MCP needs about 400 MB, a local model another 6 to 20 GB. Internet is only needed to sign in for the licence and to download Ollama – a computer without internet is activated with a file.
Installation wizard
The screenshots are from the real installer. Optional wizard steps only appear when you select them on the AI clients page.
-
Download and run the installer
The installer
TIA-MCP-v2.16.0-Setup.exeis available on the Licences page. Double-click it and choose Install for me only – TIA MCP then needs no administrator rights.Windows SmartScreen may show “Windows protected your PC” for a new release. Click More info and then Run anyway. The installer’s SHA-256 checksum is shown next to the download link.
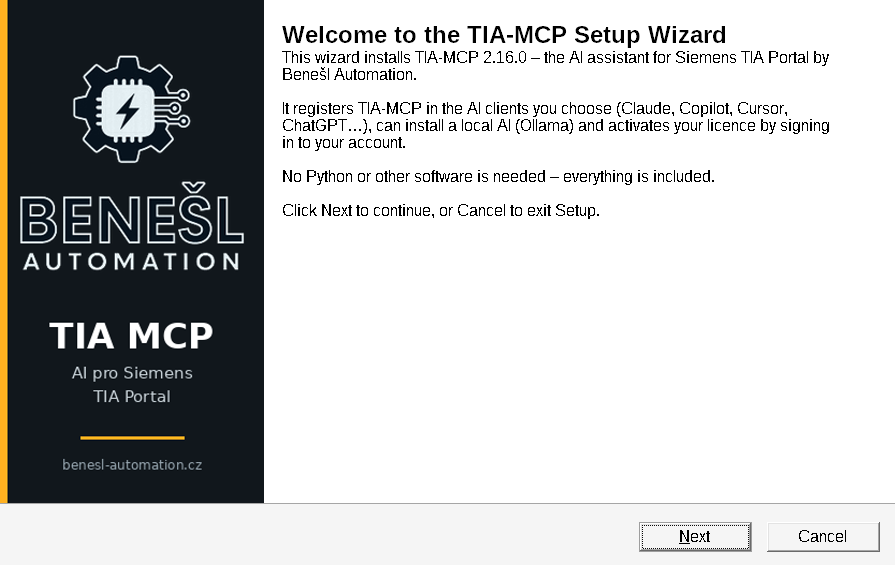
Wizard welcome page -
Licence agreement, folder and tasks
After you accept the licence agreement, the installer suggests the folder
C:\TIA-MCP. It does not allow a folder under Program Files, because TIA MCP writes logs, backups and exports into its folder. A path without accented characters is the safest.The task Add the user to the "Siemens TIA Openness" group is preselected. It needs a one-time administrator confirmation, and the membership takes effect after you sign in to Windows again. On request the installer also adds a desktop shortcut for the web interface.
-
Choose your AI clients
Programs the installer found on the computer are already checked. TIA MCP writes only its own entry
tia-portal, all other settings stay unchanged and the original file is backed up.- Claude Desktop
- Claude Code
- Cursor
- VS Code + GitHub Copilot
- Visual Studio 2022 / 2026
- Windsurf
- Google Antigravity
- Gemini CLI
- OpenAI Codex
- LM Studio
Tool set: all tools (recommended), or a narrower set for PLC, HMI, documentation, service, commissioning or migration. GitHub Copilot handles at most 128 tools, so it gets the PLC set. LM Studio gets a small set for local models.
Read only: the AI reads, analyses and suggests, but changes nothing. Writing can be enabled at any time in the web interface.
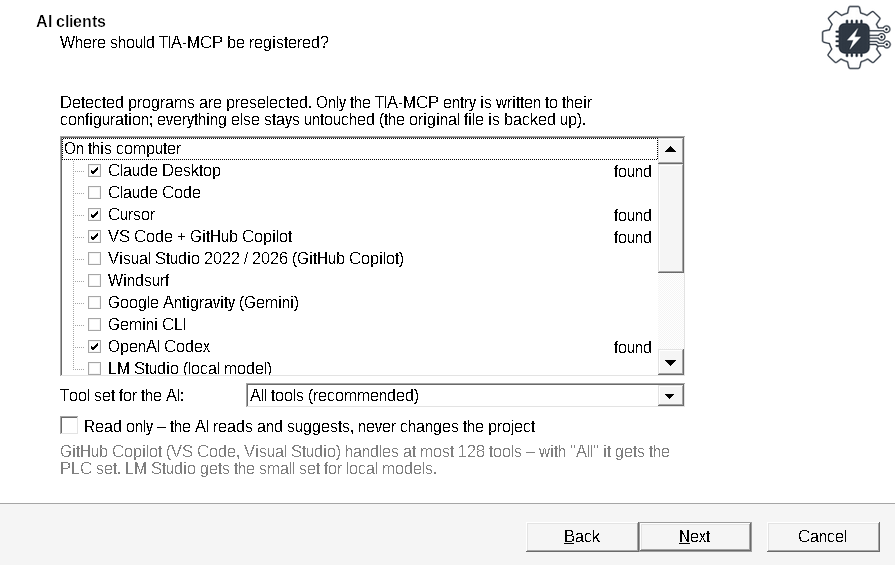
Detected clients are preselected -
Remote access for ChatGPT, Claude.ai and Microsoft 365 Copilot
Optional
A cloud AI cannot start a program on your computer, so it connects through a secure tunnel (Cloudflare Tunnel, Microsoft Dev Tunnels) that points to
http://127.0.0.1:8765. Enter the public tunnel address – you can also add it later.With OAuth sign-in you add the connector just by its address
https://…/mcp, without a secret token. You approve access with an access code the installer generates only for you. Remote clients get read-only tools by default, and remote access can start automatically when you sign in to Windows.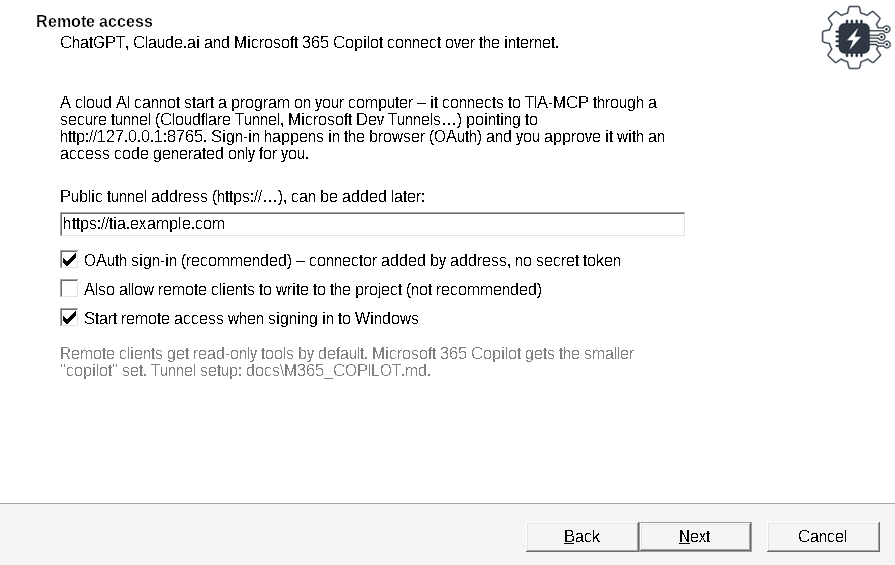
Remote access with OAuth sign-in -
Local AI without internet
Optional
The installer downloads and installs Ollama from ollama.com and downloads a model matching your graphics card and memory. It sets a 32k-token context so the model does not forget the tools, and the copilot in the TIA MCP web interface starts using the model.
Model For a computer with qwen3.5:9b 8 GB GPU (verified with TIA MCP) qwen3.5:35b-a3b 16 GB GPU, or 8 GB plus 64 GB RAM (verified) gpt-oss:20b 16 GB GPU qwen3-coder:30b 24 GB GPU or more The model is several GB, the download can take tens of minutes and can be interrupted. Cloud clients keep working – the local model is an extra option.
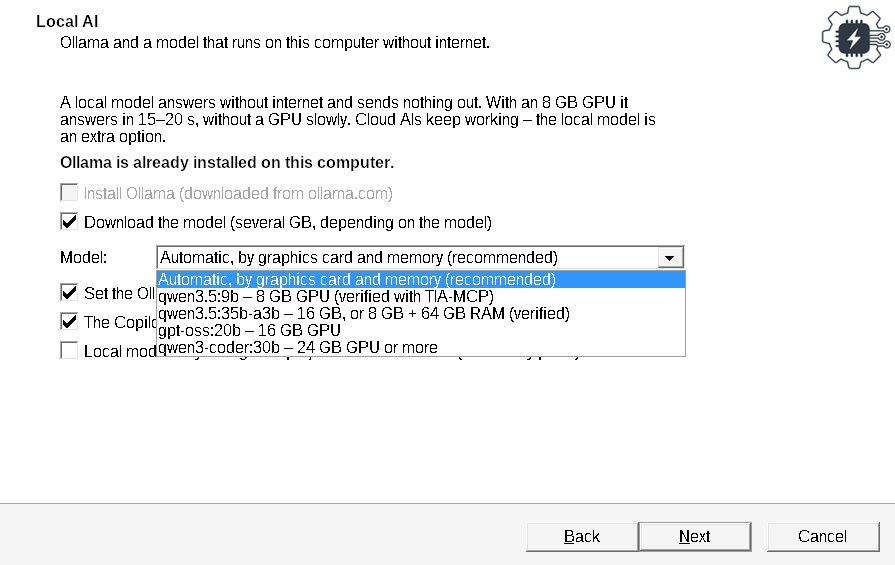
The model is chosen by graphics card -
Activate the licence by signing in
After the files are copied, choose Sign in with your Benešl Automation account. The installer shows a sign-in code and opens the Connect computer page in your browser. There you enter the e-mail you bought the licence with, type in the six-digit code from the e-mail and pick the order. The licence downloads into the installer by itself within a few seconds.
Other options: an order code
BA-ORD-…, a licence keyBA-LIC-…, alicense.licfile for a computer without internet, or a 7-day trial (unlimited reading, 50 writes to the project). You can also activate the licence later in the Licence Manager.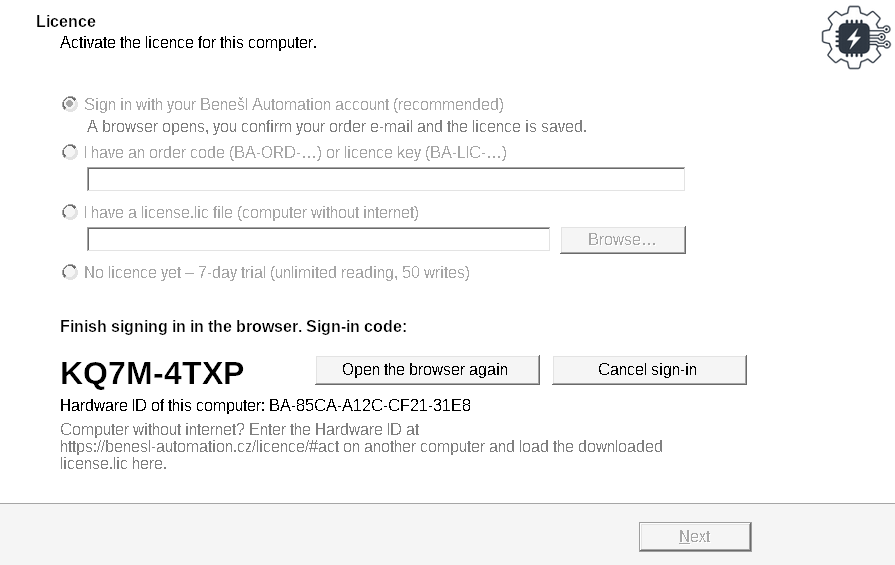
The installer waits for confirmation in the browser 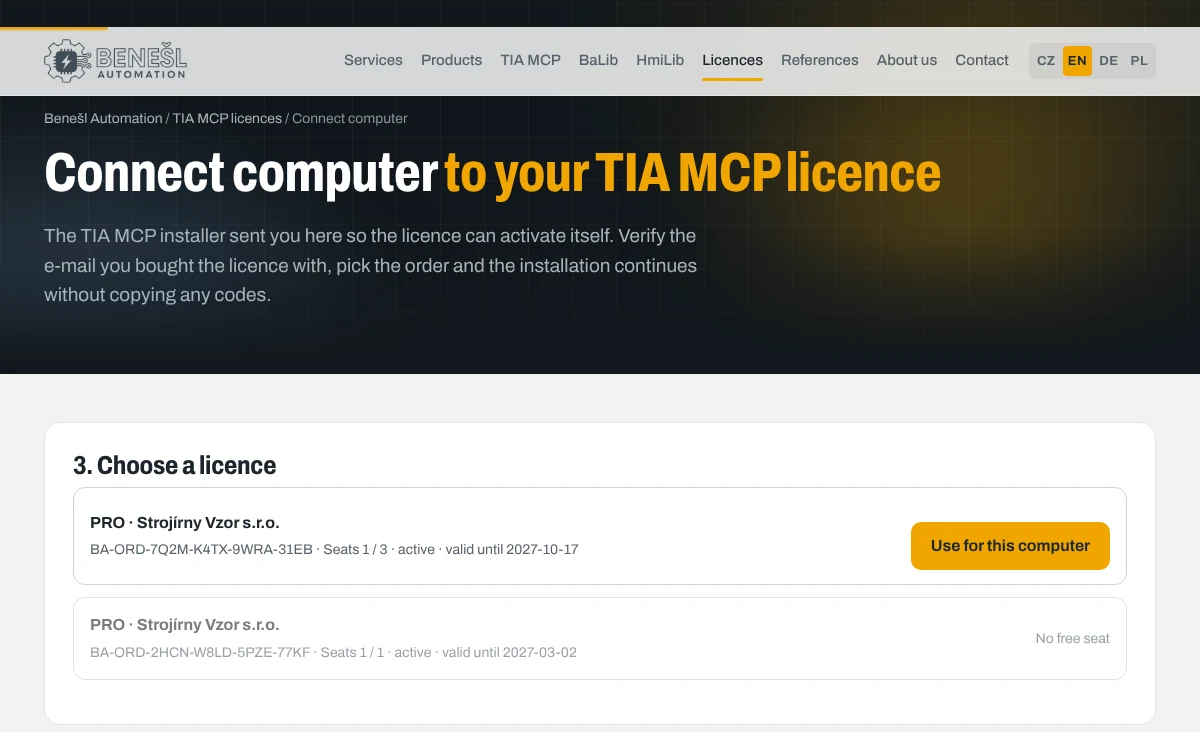
In the browser you pick the order -
Summary and first question
The last page sums up what was set up. You will find the same overview in
logs\instalace.txt.Restart your AI client (quit Claude Desktop in the notification area too), open a project in TIA Portal and ask, for example, “Which devices are in the open project?”. Confirm the Openness dialog in TIA Portal on the first connection.
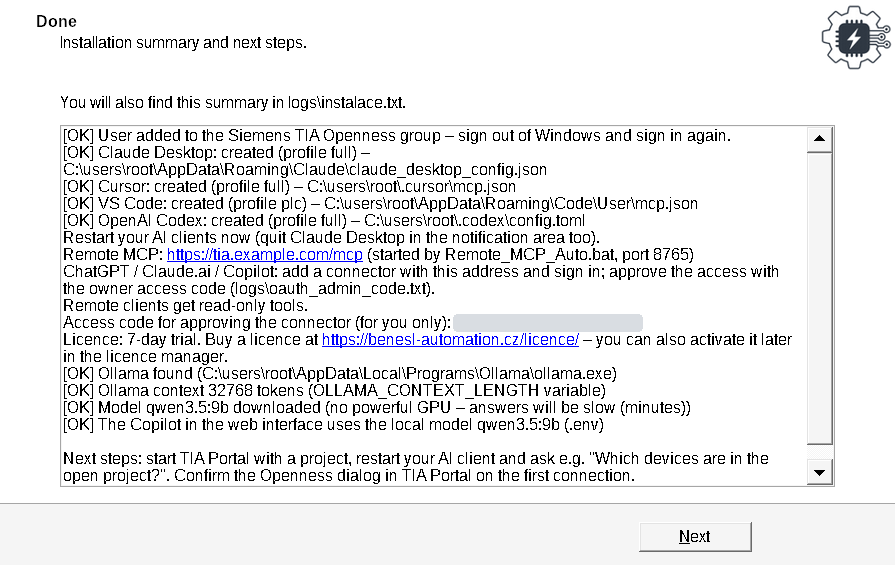
Installation summary and next steps
What you get after installation
In the Start menu under Benešl Automation → TIA-MCP.
TIA-MCP – web interface
Overview of the TIA Portal connection, write lock, plans awaiting approval, backups and a copilot with a cloud or local model.
Licence manager
The computer’s Hardware ID, activation with an order code or file, and licence status.
Register TIA-MCP in AI clients
If you install another AI client later, you register TIA MCP in it with a single run.
Remote access
Starts the server for ChatGPT, Claude.ai and Microsoft 365 Copilot if you chose to start it manually in the installer.
Manual and client guide
The user manual in PDF and a guide to configuring AI clients manually.
The logs folder
Installation summary, the access code for approving connectors and logs for support.
Silent installation for administrators
For mass deployment the installer runs without windows and takes its settings from command-line parameters.
TIA-MCP-v2.16.0-Setup.exe /VERYSILENT /SUPPRESSMSGBOXES /DIR=C:\TIA-MCP ^
/CLIENTS=auto /PROFILE=plc /LICENSEKEY=BA-ORD-XXXX-XXXX-XXXX-XXXX| Parameter | Default | Meaning |
|---|---|---|
| /DIR= | C:\TIA-MCP | target folder |
| /CLIENTS= | auto | auto = all detected clients, or a list, e.g. claude-desktop,cursor,vscode,codex |
| /PROFILE= | full | tool set: full, plc, hmi, docs, service, commissioning, migration |
| /READONLY=1 | – | read-only tools |
| /LICENSEKEY= | – | order code BA-ORD-… or licence key BA-LIC-… |
| /REMOTEURL= | – | public tunnel address, enables remote access |
| /OAUTH= | 1 | OAuth sign-in for remote access |
| /REMOTEPROFILE=copilot | – | smaller tool set for Microsoft 365 Copilot |
| /OLLAMA=1 /MODEL= | auto | install Ollama and download a model |
| /MERGETASKS="!openness" | – | do not add the user to the Siemens TIA Openness group (otherwise administrator rights are needed) |
| /LOG= | – | write the installation log to a file |
For computers where nothing can be installed, the portable ZIP with its own Python remains available on the Licences page. You register it in AI clients with Install_Clients.bat.
Updates and uninstallation
Updates
TIA MCP checks for updates itself, at most once a day, and offers a one-click installation in the web interface. Every package is signed by the vendor and the previous version is backed up.
Reinstallation
You can run a new installer over the existing installation. The licence, .env settings, logs, backups and exports stay, and the installer offers to keep the active licence.
Uninstallation
Windows Settings → Apps → TIA-MCP. Uninstalling removes the tia-portal entry from all AI clients. Your licence and data are deleted only after you confirm; Ollama and models stay.
Troubleshooting
Didn’t find an answer? Write to licence@benesl-automation.cz and send the logs\instalace.txt file.
Windows says “Windows protected your PC”
Windows SmartScreen shows this for programs that not enough people have downloaded yet. Click More info and then Run anyway. To be sure, compare the file’s SHA-256 checksum (PowerShell: Get-FileHash) with the value on the Licences page.
The AI client does not see the TIA MCP tools
Quit the client completely after the installation and start it again – quit Claude Desktop with its icon in the notification area too. If the tools are still missing, run Register TIA-MCP in AI clients from the Start menu or open the AI client configuration guide. A client installed after TIA MCP is registered the same way.
TIA MCP does not connect to TIA Portal
Check that TIA Portal is running and that you signed out and back in after being added to the Siemens TIA Openness group. On the first connection TIA Portal shows the Openness dialog – confirm the access. If the user could not be added, an administrator can do it in Local Users and Groups.
The browser did not open after clicking Sign in
In the installer click Open the browser again, or open benesl-automation.cz/licence/pripojit/ manually and enter the code the installer shows. The code is valid for 15 minutes. You can also confirm the sign-in on another computer or on your phone.
The e-mail with the code did not arrive
Check your spam folder and that you are entering the e-mail the licence is registered to. The code is valid for 10 minutes. Otherwise enter the order code BA-ORD-… you received by e-mail after the purchase into the installer.
The computer has no internet
In the installer choose the license.lic file. On a computer with internet open the Licences page → Activation, enter the Hardware ID the installer shows and load the downloaded file. TIA MCP then verifies the licence offline. Move local AI to the isolated computer as described in the LOCAL_AI guide in the docs folder.
Copilot in VS Code reports too many tools
GitHub Copilot handles at most 128 tools, so the installer writes the PLC set for it. If you changed the profile manually, choose a narrower set in the installer or in Install_Clients.bat, for example plc, hmi or service.
The model download is slow or was interrupted
The model is several GB. You can interrupt the download in the installer and finish it later with ollama pull and the model name from the summary. Without a powerful graphics card the local model answers slowly, but cloud clients keep working.
Where are the installation logs?
The summary is in logs\instalace.txt in the TIA MCP folder. A full installation log is created with the /LOG=file parameter. Server logs are in the same logs folder.