1What the module is for
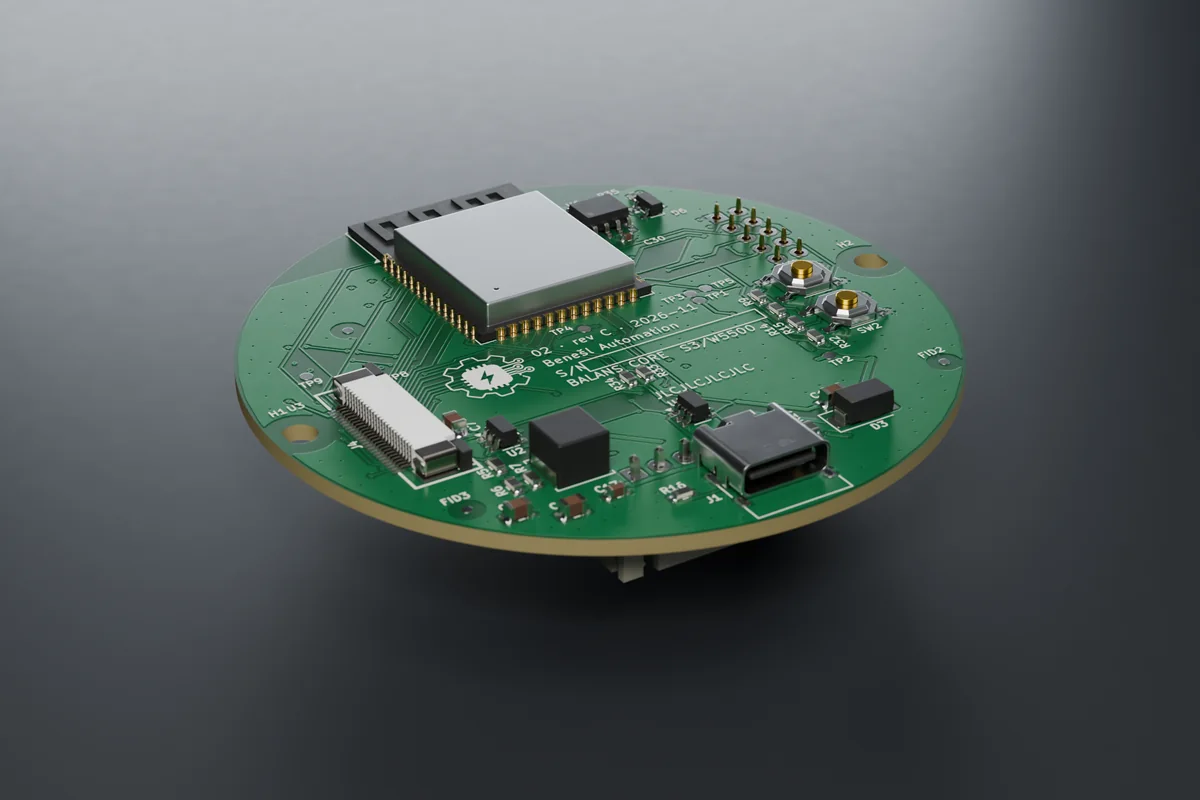
CORE connects the front panel with the power module. It runs the BALANS firmware, talks to Home Assistant (MQTT) and PLCs (Modbus TCP) and is configured in the web interface. It is powered from the POWER module: 5 V from the 230 V modules, or 12–24 V from the low-voltage and PoE modules.
Every BALANS switch consists of three layers in a single Kopos box KPR 68-70_KA (depth 70 mm): the front panel FACE behind glass, the control board CORE and the power module POWER at the bottom of the box. The boards are held by a printed carrier screwed into the lugs of the box. The panel and the 84 × 84 mm glass sit in a frame that snaps onto the carrier.
  wall <-------------------------------------------------> room
   POWER module | carrier | CORE | air | FACE panel | glass | frame
        +-- header 2x5 --+          +---- FFC 24p (type B) ---+
2Safety
3Mounting and connection
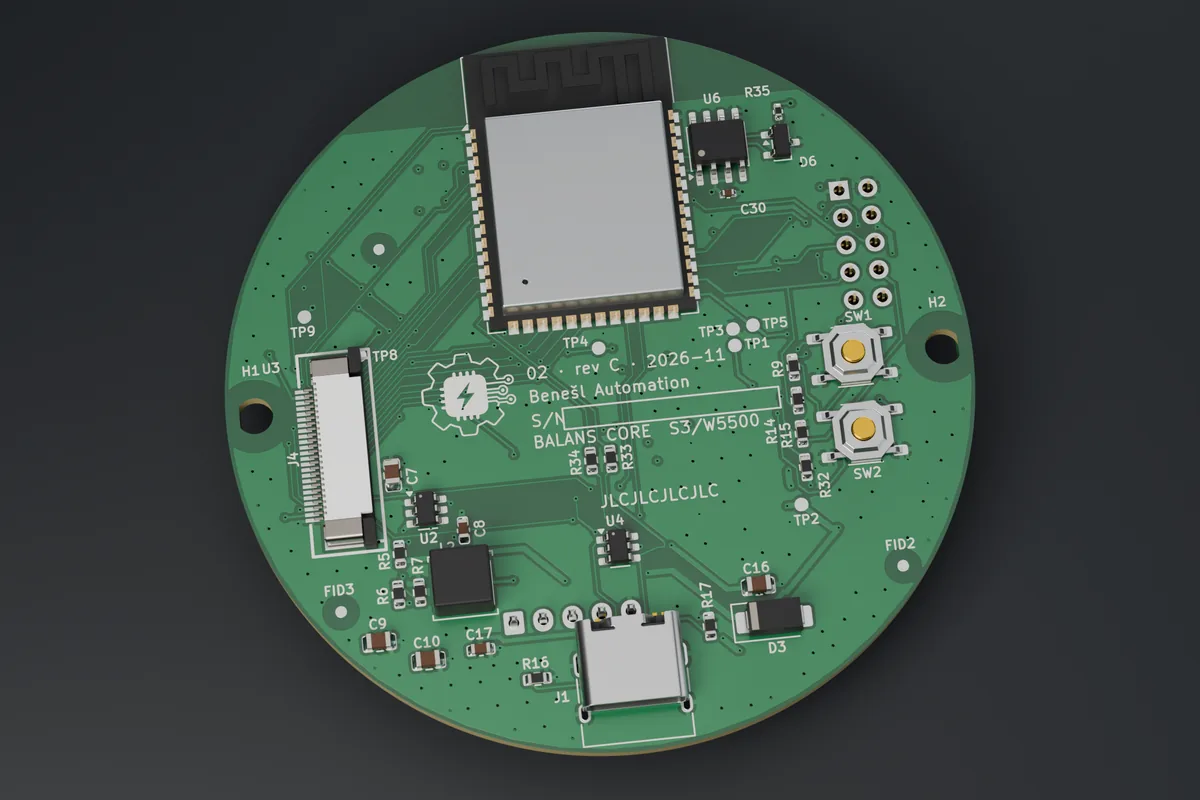
| Connector | Function | Note |
|---|---|---|
| J3 header 2×5 | POWER module (power, control signals, zero crossing) | fit straight, not offset by a row |
| J4 FFC 24p | front panel | type B cable only |
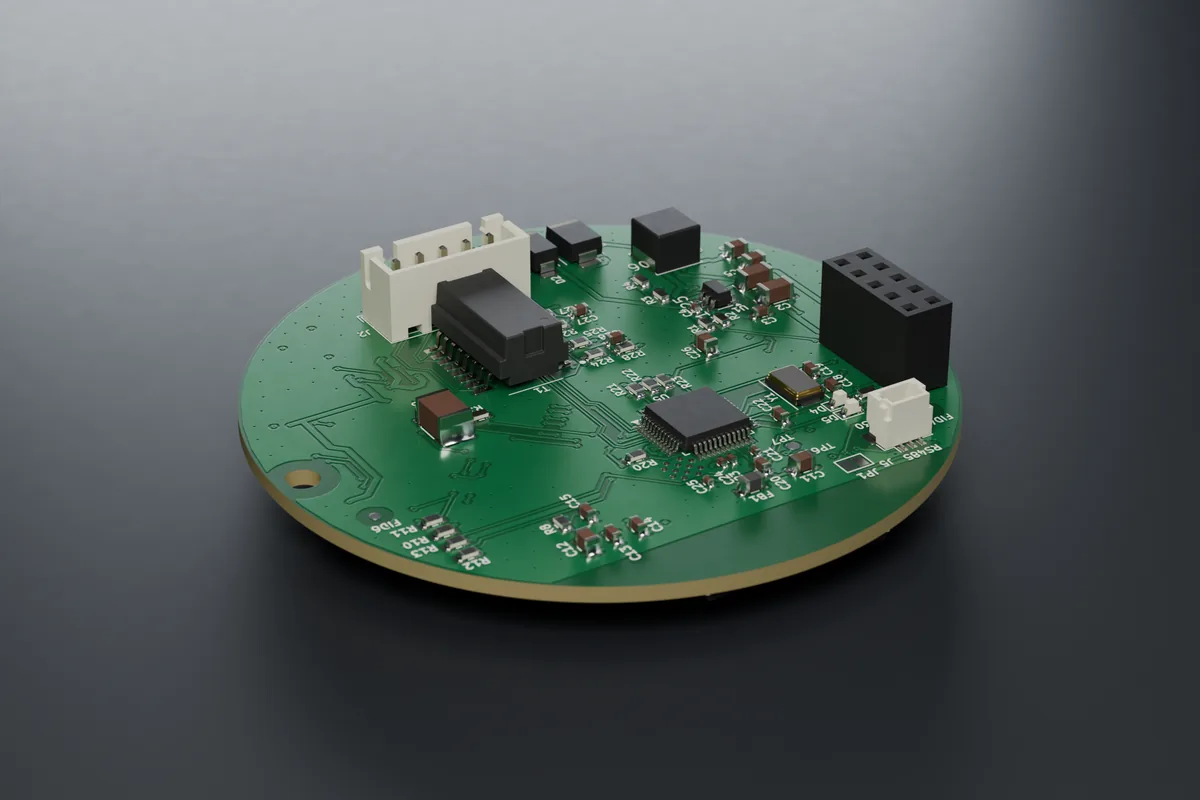
| J2 XH 5p | Ethernet to POWER Base / POWER PoE IO | XH–XH 1:1 cable; do not connect with other modules |
| J5 JST SH 3p (rev C, underside) | RS485: 1 = A, 2 = B, 3 = GND | the lead runs through the opening in the module into the wall box; join it there with terminals |
| JP1 (rev C, underside) | 120 Ω termination between A and B | solder jumper, close only at the ends of the bus |
| J1 USB-C | first flashing, service | only without the 230 V mains connected |
RS485: run the bus as a twisted pair (A, B) with a common GND conductor, separated from the 230 V conductors in the wall box. After every restart the processor sends a short service dump to the bus (about 0.1 s at 115,200 Bd). The master evaluates it as a frame with a wrong checksum and discards it. Do not connect a USB-UART converter to test points TP6 and TP7 of the rev C board.
4Technical data
| Item | Value |
|---|---|
| processor | ESP32-S3-WROOM-1-N8R2 (8 MB flash, 2 MB PSRAM) |
| network | Wi-Fi 2.4 GHz 802.11 b/g/n; Ethernet 10/100 (W5500) with the POWER Base and POWER PoE IO modules |
| RS485 (rev C) | Modbus RTU slave, 1200–115,200 Bd, 8E1 (default) / 8O1 / 8N2, address 1–247; transceiver with automatic direction control, TVS protection; in development |
| power supply | +5 V from the module (03, 03B, 03F, 03G, 03H, 03I-T, 03I-R, 03J) or 12–24 V DC (03C, 03D, 03E) |
| connectors | 2×5 header to the POWER module, 24p FFC to the panel (type B), XH 5p for Ethernet, JST SH 3p for RS485 (rev C), USB-C (service) |
| buttons | RESET, BOOT |
| board | Ø 65 mm, 4 layers, 2× 3 × 6 screw from the front into the carrier |
| board revision | C |
Load ratings are preliminary until heating tests are complete.
5Commissioning
- Switch on the circuit breaker (or connect PoE / power). The front panel lights up.
- Without Ethernet and without a configured Wi-Fi, the switch starts its own setup Wi-Fi “SmartButton-XXXX” (XXXX = end of the MAC address). The password is the 8-digit setup code from the label. The administrator can find it later in the web interface too (card “About the device and support”, button “Show code”, confirmed with the password). On the FACE Display panel the code appears on the display in the settings window (hold the centre for 5 s).
- Connect a phone or laptop and open http://192.168.4.1.
- Set the web password (8–31 characters) and give it to the user together with the label.
- The web interface offers the Setup wizard: name and room, front panel and power module (the wizard shows which module the switch has detected), touch calibration, Wi-Fi and time zone, Home Assistant (MQTT), default button layout and a summary. Nothing is written to the switch before the last step. After a change of panel or module the switch restarts and the wizard continues.
- No output moves until a module is selected. If the selected module does not match the connected one, the outputs stay off and the web interface shows the reason (code E02). A new switch can also select the module by itself: after the first power-on nothing happens, after the second the module is set (POWER Relay and Triac with mains connected, RGBW with the newer board, Base from PoE, PoE IO). The outputs then stay off until someone switches them on for the first time. Heating, blinds and modules in development are not set automatically. If the switch is to stay without a module, confirm “No module” on the Hardware page.
- Test all outputs and touch areas.
- The web interface is then at http://<name>.local or at the IP address from the router. With Ethernet (POWER Base, POWER PoE IO) the switch gets its address from DHCP.
Touch calibration is done through the glass once the front is assembled. It can be started in three ways: in the wizard (step Touch), on the Touch page with the “Calibrate on device” button (the LEDs under the areas guide you: white = do not touch, green = touch and hold, blue = release; at the end green = saved, red = weak area), or right on a new switch without a password: for the first 2 minutes after power-up the LED under the first area slowly “breathes” white, and holding this area alone for 3 s starts the calibration. The areas keep switching as usual meanwhile.
Calibration is also started by a short press of the BOOT button on the control board. On a panel with a slider, the slider finally lights up green: slide slowly along it from one end to the other. After power-on the switch does not respond to touch for about 3 seconds while it measures the idle values of the areas; lights that are to be on after power-on light up immediately.
If Wi-Fi does not connect, the web interface says why in plain words: the network was not found, the password does not match, or the security does not fit. It shows the signal strength with four bars and a word (excellent to very weak) in the header and on the Network page. A hidden network does not appear in the list; type its name by hand.
Web modes: Standard, Advanced and Expert (System → Web appearance). The mode only hides pages and cards an ordinary user does not need. The configured values remain, and warning cards are never hidden. The web interface is in Czech, Slovak, English, Polish and German and is adapted to phones as well. Explanations are short; details open with the “i” button.
Setup mode can be opened again with a gesture: hold two touch areas firmly at the same time for 5 s (FACE Display: the centre of the display for 5 s), or the BOOT button on the control board for 3–10 s. The setup Wi-Fi starts for 5 minutes and the LEDs flash blue. Without Ethernet it also starts when the switch cannot connect to the network for 3 minutes.
Time: the switch takes the time from the internet (NTP). In a network without internet it takes it from the browser after the administrator logs in. Without valid time the scheduler, the night mode and the weekly thermostat programme wait (code E12).
Home Assistant: turn on MQTT and “HA discovery” in the web interface; the entities appear by themselves and are placed in the given room. PLC: Modbus TCP is off by default and is enabled in the web interface (Integrations), preferably read-only and with an allowed IP address. The switch belongs in a separate network (VLAN). Remote access only through Home Assistant or a VPN, never by port forwarding.
Firmware is updated by a technician in the web interface (System → Updates) with a file supplied by the manufacturer. The update is signed. The new firmware is confirmed once the network and the web interface come up after the restart; otherwise the switch rolls back to the previous version by itself within 5 minutes. An update from an address needs a direct link; the switch rejects redirects. Optionally you can enable nightly automatic update from a private https address (off by default): it only runs at the chosen hour, when nothing is lit, no shutter is moving and nobody has touched the switch for 30 minutes. The firmware is not published. This manual describes firmware 2.38.3 (built and signed, not yet verified on the device).
Handover to the customer (System → Maintenance): one action for the installer at the end of the installation. It asks for the administrator password again, offers to set the password of the “control only” user and a new administrator password that only the customer will know (both can be skipped), then it deletes the traces of testing: event log, charts, consumption estimate, log, API tokens, webhooks and the syslog target, and ends all sessions. Optionally it also deletes the stored Wi-Fi. Installation settings, calibration, scenes, scheduler, integrations and passwords remain; the dialog lists which access credentials are left in the switch.
Settings change history (System): the last 8 saved changes with the time and the area they concerned, without values. The “Undo last change” button returns the settings to the state before the last change. Passwords, tokens, keys and the hardware selection are not reverted.
Factory reset from the web interface requires the administrator password to be entered again. With the BOOT button on the board (hold for 10 s) it works without a password; holding it for a shorter time does not reset the switch.
Device health (Diagnostics page): in one word “OK”, “Warning” or “Error”, and below it why and what to do about it. The administrator also finds a list of the last 8 firmware crashes there; if crashes repeat, send it to the manufacturer. The same status is in Home Assistant.
Manuals: the “About the device and support” card has links to the manual for the panel, the module and the control board at benesl-automation.cz/balans/navody/.
Service: System → Maintenance → Service bundle saves one file with the version, status, diagnostics and settings without passwords and keys. It contains network names and IP addresses, so send it only to the manufacturer, not publicly.
6Controls and LEDs
| LED / button | Meaning |
|---|---|
| D4 green ACT | Ethernet activity |
| D5 yellow LINK | Ethernet connected |
| RESET | restart (Ethernet too) |
| BOOT | only for flashing firmware over USB |
Module detection: before enabling the outputs, the switch measures which POWER module is connected and compares it with the selection on the Hardware page. If they do not match or the module cannot be determined (for example without mains voltage when powered from USB only), the outputs stay off. The check is repeated every 10 s during operation.
7What the firmware can do
The same firmware runs in all assemblies. Overview according to version 2.38.3. Everything is built and signed, not yet verified on the device (the board runs the older version 2.10.2).
| Area | What the switch can do |
|---|---|
| Settings | setup wizard, web modes Standard / Advanced / Expert, web interface in 5 languages and on phones, light and dark theme, settings backup and restore, change history with undo of the last change, handover to the customer |
| Outputs | automatic switch-off, staircase timer with a warning before switch-off, power-on state for each output (restore / off / on), maximum brightness and dimming curve, wizard for the lowest brightness without flicker, brightness by time of day for dimmed outputs (POWER Triac, POWER RGBW; off by default), consumption estimate from the rated power |
| Touch | short, long, double and triple touch, hold, very long press, two areas at once, palm tap, slider with level bar, cleaning lock, child lock, touch calibration from the web interface and directly on the device, automatic switch-off of a faulty or wet area |
| Backlight | separate brightness for on / off / idle, night brightness by time or sun, LED notifications from Home Assistant, optionally colour by air quality |
| Thermostat | local thermostat with a weekly programme (8 points) and early start, open window, frost protection, minimum switching times; if the temperature is lost, the output switches off |
| Temperature | BME688 sensor on the panel (optional), or a shared temperature from another switch or from Home Assistant (valid for 5 minutes) |
| Without a server | 8 scenes, scheduler (12 entries, time / sunrise / sunset, conditions dark / light / temperature), presence simulation, linking of switches on the network (16 channels, signed messages) |
| Home Assistant | MQTT with auto-discovery, room, button triggers, energy, update entity, Fault and Errors entities |
| PLC and more | Modbus TCP, REST API with tokens, webhooks, syslog; function block for Siemens S7-1500 |
| Security | login without sending the password, administrator and “control only” roles, optional HTTPS, signed updates with rollback to the previous version |
| Display (FACE Display) | widgets including Settings (brightness, volume, quiet at night) and Functions (holiday, heating programme, slats by the sun), countdown up to 3 hours, display child lock |
| Diagnostics | error codes E01–E26, Device health card, list of recent crashes, event log, 7-day charts, service package, time even without internet, Wi-Fi signal strength in bars and a plain reason why Wi-Fi does not connect |
| Production and rollout | a new switch can be set up over USB (only in the factory state) and in bulk with the Správa (Manager) program; the result of the production test and the label data are stored in the device |
| Updates | manually from a file or from an https address; optionally an automatic night update from a private address (off by default) |
In development (the drivers are written, switched off in the standard build, not verified on the board): POWER DALI, POWER Blinds including slats, sun tracking and the wind and rain lock, POWER 0–10 V, POWER Heat Triac and Heat Relay, the FACE Sense panel including presence-based light, Modbus RTU over RS485. Colour temperature of DALI luminaires by time of day, the POWER Dimmer LED module and the POWER Relay rev C relay board are in preparation (the firmware recognises them; only the development build can control them).
8Troubleshooting
| State | Meaning | What to do |
|---|---|---|
| “Outputs are off” (E02) | the selected module does not match the connected one, the module has no supply, or it is detected but not supported by this firmware | correct the selection on the Hardware page; for a module in development wait for firmware with support |
| “module: none” in the web interface | no module selected | Hardware → select the module, or the wizard |
| LEDs flashing blue | setup mode (5 min) | connect to the SmartButton-XXXX Wi-Fi |
| the LED under the first area “breathes” white | a new switch offers touch calibration (2 min after power-up) | hold this area for 3 s, or leave it |
| three red LED flashes | a fault of severity “error” has occurred | open the web interface, the banner at the top shows the code |
| one area flashes red (E25) | the switch has turned this area off because it would switch by itself (water on the glass, missing calibration) | wipe the glass and wait half a minute; then calibrate the touch |
| only web interface and updates (E01) | safe mode after 3 crashes within 60 s of start | upload another firmware version, send the service bundle to the manufacturer |
| no network (E11) | Wi-Fi or router outage | touch keeps controlling the outputs; without Ethernet the setup Wi-Fi starts after 3 min |
9Error codes
From firmware 2.22.0 the switch reports faults and states as codes E01–E26. It evaluates the state every 2 s, for the first time 8 s after start. An error is reported when it lasts 2–4 s and disappears by itself as soon as it no longer applies. Severity: error = something does not work or is switched off for safety reasons, warning = works with limitations, information = for your information only. The codes only report; the protections of the modules work independently of them.
| Where you see the error | How |
|---|---|
| web interface | a banner at the top of every page: code, name and what to do |
| Home Assistant | entity Fault (problem yes / no) and Errors (list of codes, “OK” without errors) |
| MQTT | topic <prefix>/<id>/faults (codes and English text, “OK” without errors) |
| Modbus TCP / RTU | input registers IR 46 (E01–E16) and IR 47 (E17–E32), bit n − 1 = code En, 0 = no error |
| event log and log | a record when each code appears and disappears |
| LEDs on the panel | when an error occurs they flash red three times; warnings and information do not flash |
| Code | Severity | Meaning | Typical cause | What to do |
|---|---|---|---|---|
| E01 | error | Safe mode | the firmware crashed three times in a row within 60 s of start | Outputs and integrations are off; the network, web interface and updates run. Upload another firmware version, send the service bundle. |
| E02 | error | Power module does not match the selection | a different module selected than connected; module without supply; detected but unsupported module | The outputs did not start. Correct the selection on the Hardware page. |
| E03 | error | The command did not reach the output / output fault | overloaded relay driver; on POWER PoE IO a DO output fault (then together with E05) | Switch the output again. If it repeats, check the module, the load and the power supply. |
| E04 | error | The POWER PoE IO module does not respond (10 s after start) | broken cable, module without power (PoE / 24 V) | Check the connection between the CORE board and the module and its power supply. |
| E05 | error | Digital output fault | short circuit, overload (resettable PTC fuse), external voltage on the output | Disconnect the load, check the wiring. The output recovers once the fuse has cooled down. |
| E06 | warning | Analog input out of range | broken wire, short circuit, wrongly selected input type | Check the sensor, the wiring and the settings on the Inputs / outputs page. |
| E07 | warning | The BME688 sensor stopped responding | loose flat cable to the panel, faulty sensor. A sensor that is not fitted is not an error. | Check the flat cable. An enabled thermostat keeps its output off meanwhile (E09). |
| E08 | warning | Temperature source not available (panel without sensor; 5 min after start at the earliest) | the source switch is off or has a different link key, Home Assistant has not sent the temperature for more than 5 min | Check the source switch or the automation in HA, or select another source (Panel & LED). |
| E09 | error | The thermostat has no temperature (60 s after start at the earliest) | a consequence of E07 or E08, or a thermostat without a sensor and without a temperature source | The thermostat output is off until the temperature is restored. Remove the cause. |
| E10 | warning | MQTT not connected (for more than 2 min) | wrong broker address or password, broker not running, network outage | Check the Integrations page and the broker. Local control keeps working. |
| E11 | warning | No network (for more than 2 min) | cable unplugged, wrong Wi-Fi password, router switched off | Check the cable / Wi-Fi. Local control keeps working. |
| E12 | information | Time is not set (5 min after start) | no access to NTP and after a power failure | Log in to the web interface (the time is taken from the browser), or enable NTP. |
| E13 | warning | Low free memory | many functions running at once (HTTPS, voice) | Switch off unused functions or restart. If it keeps coming back, send the service package. |
| E14 | warning | High temperature of the control board (default threshold 85 °C) | poorly ventilated wall box, high load, high LED brightness | Check ventilation and load. The threshold is in Diagnostics. |
| E15 | warning | Errors on the panel bus | flat cable, connector, interference | Check the flat cable to the front panel. |
| E16 | error | DALI bus without power or short-circuited | bus power supply off, DA+ / DA− short circuit | Check the DALI power supply and wiring. Without bus power at start-up the module does not start at all (then E02). |
| E17 | warning | Hardware check warning | e.g. the display touch controller was not found | Follow the text of the warning in the web interface. |
| E18 | information | The last restart was a crash or a supply voltage drop | firmware fault, weak power supply | If it happens once, nothing; the message disappears by itself an hour after start. If it repeats, send the service package. |
| E19 | warning | Touch has drifted out of tune | cover changed, humidity, dirt on the glass | Only a warning; touch keeps working. Wipe the glass and run the touch calibration. |
| E20 | warning | Blind position unknown (the blind is stationary, 5 min after start at the earliest) | restart or power failure during travel, travel time limit hit | Run fully up or down; the position will realign. |
| E21 | information | Blind locked (wind / rain) | the lock was set by an HA automation, the PLC or the web interface; without renewal it ends by itself after 6 h | Nothing; just know why the blind will not go down. It can be cancelled by the automation that set it, or by the administrator in the web interface. |
| E22 | warning | Automatic update failed, the version is being skipped | the new version was not confirmed after installation, or it could not be downloaded or verified 5 times | The previous version is running. Install manually, or wait for a newer version. |
| E23 | error | Current measurement of the POWER Heat Relay module does not respond | the module's energy meter has been silent for more than 5 s; reported for the whole duration of the outage | Without the “Heat even without the energy meter” setting the module does not heat (frost protection only). With it, it heats by temperature; the wiring is then protected only by the circuit breaker and consumption is not counted. Report to the manufacturer. |
| E24 | error | Floor sensor fault or invalid sensor settings | sensor open or shorted, converter does not respond, sensor type or values out of range | The zone does not heat, not even frost protection through this sensor. Check the sensor and the wires (the web interface shows the resistance), the sensor type and values. |
| E25 | error | The touch area is switched off | uncalibrated panel, water on the glass, a hand on the panel at power-on, interference, a faulty area | Only the touch of this area is switched off (for the slider, the whole slider); its LED flashes red. The other areas, the web interface, Home Assistant and the scheduler keep working. Wipe the glass and wait about half a minute; if the error does not disappear, run the touch calibration in the web interface or with a short press of BOOT. |
| E26 | error | The POWER Dimmer LED dimmer was switched off by its protection | the overcurrent protection switched the output off three times within 2 s: short circuit, too large a load, unsuitable lamp | The output stays off even after a restart. Check the load and switch the light on again manually (button, web interface, Home Assistant). The scheduler and timers do not switch it on. |
Time-dependent codes appear only after a delay following start-up (E04 10 s, E09 60 s, E10 and E11 2 min, E08, E12 and E20 5 min), so that a normal start-up does not report an error. The POWER Heat heating modules report a sensor or measurement fault with codes E23 and E24; trips of the temperature limits and overcurrent are shown in the module status. For a PLC it is enough to monitor IR 46 <> 0 OR IR 47 <> 0.
10Declaration of conformity, disposal, manufacturer
EU declaration of conformity: in preparation. We will publish the document on this page once testing is finished (safety, EMC, radio, cybersecurity to EN 18031). Until the declaration of conformity is issued, the module is not intended for sale.
The switch contains a 2.4 GHz Wi-Fi radio (band 2400–2483.5 MHz). We will add the maximum transmit power and the simplified declaration of conformity after the conformity assessment.
Disposal (WEEE): do not dispose of the product with household waste (crossed-out wheelie bin symbol). Take it to a collection point for electrical equipment or return it to the seller.
Manufacturer: Ing. Tomáš Benešl – Benešl Automation, Ludvíka Svobody 12, 747 57 Slavkov, IČO 04250435, benesl@benesl-automation.cz, +420 732 413 773.
Downloads
- PDF manual: BALANS_02_navod.pdf
- EU declaration of conformity: in preparation (after testing)
Document version
| Version | Date | Change |
|---|---|---|
| 1.3 (draft) | 13. 11. 2026 | firmware 2.38.3: switching off a faulty or wet area (E25), slider and level bar, double and triple touch, automatic module selection, Device health, password at handover and factory reset, heating: early start; renders with the corrected marking; board rev C |
| 1.2 (draft) | 12. 11. 2026 | firmware 2.36.11: handover to the customer, settings change history, lowest-brightness wizard, Show code button, plain Wi-Fi messages |
| 1.1 (draft) | 11. 11. 2026 | firmware 2.35.0: setup wizard, touch calibration, error codes E01–E24, new mounting order and 3 × 6 screws, final renders |
| 1.0 (draft) | 9. 11. 2026 | first issue, firmware 2.10.2 |